How to Make Festive Disney-Inspired Christmas Pinwheel Cookies
You can create fabulous holiday treats that look like they just came out of the Main Street Confectionery this Christmas. This Disney-inspired Christmas Pinwheel cookies recipe is a great way to start. Stay tuned because I will have many more ideas and recipes to make this season as magical as possible.
Cookies of Childhood
When I was a kid my mom would make pinwheel cookies – usually for Christmas. I remember three different kinds – red and white, green and white, and chocolate and white (my fav!). They were a fun addition to the cookie trays that she would put out for guests that included a lot of the classics: sugar cookies, chocolate chip, chocolate crinkles, thumbprints and kolache.
I took the pinwheel cookie recipe from my childhood and made it magical. I hope you enjoy these Mickey-shaped cookies this Christmas as much as I do!
Disney-Inspired Christmas Pinwheel Cookies
Ingredients
Method
- Combine the dry ingredients (flour, baking powder, salt) in a medium bowl and set aside.
- Cream the butter, Crisco, and sugar in a large bowl.
- Add eggs and mix until incorporated.
- Stir in vanilla.
- Add the dry ingredients to the butter mixture and mix until a soft dough forms.
- Divide the dough in half and put in two separate bowls.
- Add a small amount of red gel food coloring (about the size of a 1/2 of a pea) and mix it into half of the dough. Add more gel coloring if needed to get a nice red color.
- Repeat the above instruction with the green gel food coloring in the other half of the dough.
- Cover and refrigerate the red and green dough for several hours or overnight.
- Remove the dough from fridge. Put a piece of parchment paper down on your workspace. Lightly flour the parchment paper.
- Place the red dough onto the parchment paper. Lightly sprinkle flour on top of the dough. Also, flour your rolling pin. (If the dough starts to stick, sprinkle more flour!) Gently roll out the dough until you have about a 10"x10" square. Leave it on the parchment paper for now and set it aside.
- Repeat the above step with the green dough. You now have two pieces of parchment paper each with a rolled out square of dough.
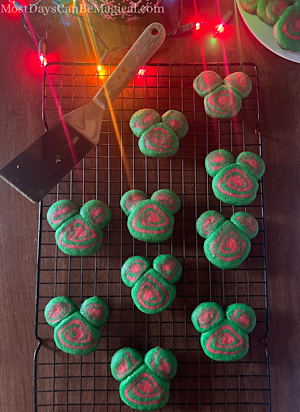
- Pick up the parchment with the red dough and flip it over onto the green dough. You should end up with parchment on the top and bottom with the red and green dough together in the middle.
- With the rolling pin, roll the layers of dough down to a thickness of about 3/16". Gently, pull back the top parchment paper and discard.
- Out of this layered dough you are going to need to make three rolls. One larger one to make the Mickey face, and smaller ones for ears. With a knife, cut the dough about 60% of the way across – this part will be the big roll. Cut the remaining 40% in half so you now have two smaller pieces to roll for ears. You now have a total of three pieces to roll. Begin at the edge of each piece of dough and start to roll it tightly. (If the dough is stuck use a lightly floured offset spatula under the edge to get it started.)
- Wrap each roll of dough in plastic wrap and place in the fridge for several hours or overnight.
- Make the egg wash by cracking the egg in a small bowl, adding 2 tsp water and mixing until combined.
- Remove the large roll from the fridge and cut into 1/8" thick slices. Place on a parchment lined baking sheet. (Gently manipulate slices with your hand to make them more "round" if need be.)
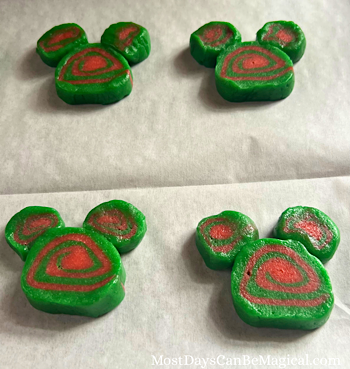
- Remove the smaller rolls from fridge and cut into 1/8" thick slices. Using a dab of egg wash (with a pastry brush or your finger) attach two "ears" to each large circle that you placed on the baking sheet. Each cookie should now be "Mickey-shaped."
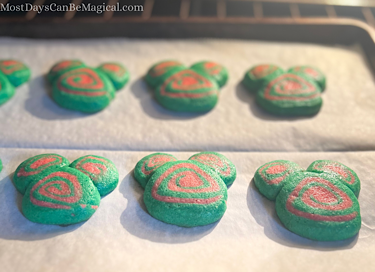
- If the dough is starting to soften, place the baking sheet in the fridge until the dough firms back up before baking – this will keep the cookies from spreading out too far.
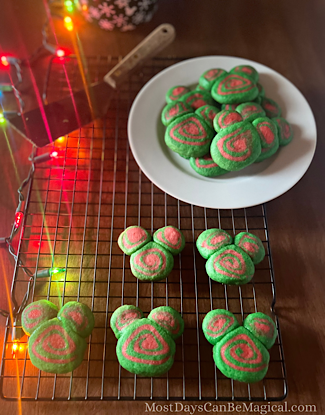
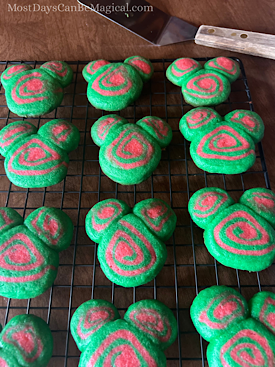
- Bake at 400° for approximately 8-10 minutes. The bottoms will be browned slightly when done. Let the cookies cool on the baking sheet for a few minutes before transferring to a cooling rack.
Soft, Sweet, & Buttery
Did you make these Disney-inspired Christmas Pinwheel Cookies? How did they turn out? These cookies have a simple list of ingredients but I think they are one of the tastiest cookies that I’ve made. Let me know in the comments!
More Tasty Christmas Fun
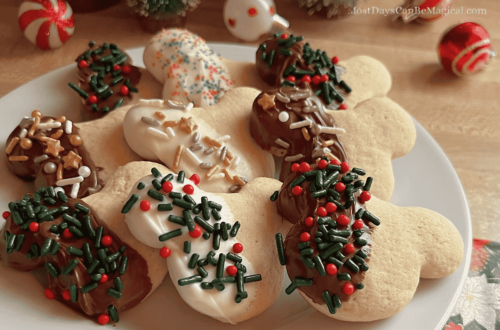
If you liked this recipe, you might enjoy these Mickey-shaped Rice Krispies Treats or these Disney-inspired dipped Christmas Cookies.